
What is an IP warm up & Why do you need it?
Email deliverability directly impacts your campaign success rates. Your IP address reputation determines whether your emails reach inboxes or get blocked by spam filters.
Starting with a new IP address without proper warmup is like trying to get a mortgage with no credit history. ISPs (Internet Service Providers) don’t trust unknown senders, which means your emails won’t get delivered.
The risk of lost revenue from poor email deliverability is very real. According to Validity’s 2023 Email Deliverability Benchmark Report, one in six permission-based marketing emails doesn’t reach the inbox. Most of them lose their inbox placements due to a lack of proper IP warmup.
This article will help you understand what an IP warmup is and why you need it, as well as show you the best IP warmup practices to keep in mind when warming your IPs.
Your pre-warmup checklist
Before you send your first email, make sure you’ve covered these essentials:
Set up SPF, DKIM, and DMARC authentication
Acquire a dedicated IP address
Validate domain and subdomain reputation
Clean and verify the email list
Segment most engaged users
Prepare high-quality welcome content
Finalize a gradual sending schedule
Set up monitoring tools and dashboards
Configure feedback loops with major ISPs
Test email rendering across devices
What is IP warm up?
IP warmup (or IP warming, IP warm up) is the process of sending emails from a new (also referred to as ‘cold’) IP address and gradually increasing send volumes according to a predetermined schedule in order to establish a positive reputation for the given IP address.
An IP address is a unique set of numbers that identifies your email domain. ISPs use your IP address to track and evaluate your email activity and, in the end, to determine your IP reputation.
If an IP address is entirely new, you need to warm it up first in order to achieve high email deliverability of your email campaigns.
How to do Email Warmup
Why is IP warm up important?
The purpose of IP warmup is to improve your IP reputation and gain ISPs’ trust so all your emails can be delivered right into recipients’ inboxes (and not be blocked by spam filters).
Whenever you start sending emails from a completely new IP address with a non-existent reputation, ISPs and ESPs (Email Service Providers) can get suspicious about it and prevent your IP from delivering large bundles of emails until you “prove” that you are a reliable sender.
IP warmup helps create a positive reputation for your new IP by gradually sending a larger and larger number of emails over a period of several weeks until it’s ready and properly “warmed up” for real email campaigns.
| Note: It is important to understand that IP reputation is not the only factor that can impact your email deliverability. ISPs also take into account the reputation of your email domain, subdomains, or even a specific email address when determining if or how many messages should be delivered to your recipients. |
What impacts IP reputation?
An IP’s reputation can be influenced by many factors, such as:
- Spam reports – the number of spam complaints that your IP receives.
- Delete rate – the number of recipients that moved your emails into their trash folder.
- Bounce rate – the number of emails that were not delivered to recipients’ inboxes.
- Engagement rate – the number of people who opened, replied to, or forwarded your emails.
- Unsubscribe requests – people who unsubscribed from your email list.
- Email content – the quality of your messages, grammar mistakes, usage of spam words, the trustworthiness of included links, etc.
- Blacklists – The reputation of an IP address can suffer if it is put on one of the popular email blacklists.
And many other factors…
It’s important, though, to understand that not all of these components carry the same weight.
For example, your IP reputation won’t be dramatically influenced if some people unsubscribe from your email list; on the other hand, having a ton of spam reports can severely damage the reputation of your IP.
It’s recommended to keep spam complaints below 0.1% across all ISPs, as rates above 0.3% will trigger immediate throttling. Different ISPs have varying tolerance levels – Yahoo allows only 0.1%, while Gmail is slightly more forgiving at 0.2%.
Recovery time after a complaint spike typically takes 30-60 days of perfect sending behavior.Source: snov.io
https://static.wixstatic.com/media/32b7a1_b20a6e03…o/32b7a1_b20a6e03709145b7a105ee326f084130~mv2.png
How does IP reputation scoring work?
The science behind IP reputation is more complex than many marketers realize. Most ISPs use reputation scores ranging from 0-100, where new IPs start at zero and must earn their reputation through consistent good practices.
Excellent reputation scores (90-100) achieve 95-98% inbox placement, while poor scores (30-49) see only 30-59% of emails reach inboxes, with the rest landing in spam folders or being blocked entirely.
| Score range | Reputation level | Typical inbox placement | Common restrictions |
| 90-100 | Excellent | 95-98% | None |
| 70-89 | Good | 80-94% | Minor throttling possible |
| 50-69 | Fair | 60-79% | Moderate throttling, bulk folder |
| 30-49 | Poor | 30-59% | Heavy throttling, spam folder |
| 0-29 | Terrible | 0-29% | Blocks, blacklists |
Gmail’s AI stops over 15 billion spam, phishing, and malware emails daily and can identify sending pattern anomalies within minutes. Their algorithms are designed to catch new IPs that attempt to bypass reputation systems.
The IP warming playbook: A step-by-step guide
Every inbox starts cold, and every new sending IP is a blank slate in the eyes of spam filters.
If you want reliable inbox placement, you need to warm your IP address with discipline and precision. Our IP warming playbook gives you a phase-by-phase framework to establish technical trust, earn sender reputation, and accelerate your path to high-volume, high-engagement email campaigns.
Phase 1: Technical foundation (before you send a single email)
IP warming starts with three technical requirements: authentication, dedicated IPs, and domain health. Major inbox providers in 2025 require strict compliance. Misconfiguration at this stage blocks inbox placement for new senders.
To set up your technical foundation before you start sending emails:
Implement robust email authentication
- Set up SPF, DKIM, and DMARC for every sending domain and subdomain.
- Publish an SPF (Sender Policy Framework) record with every authorized server. Use ~all during the first 30 days. Keep SPF lookups at ten or fewer.
- Generate DKIM (Domain Keys Identified Mail) keys at 2048-bit strength. Use different selectors for each mail stream. Rotate keys after six months.
- Set DMARC (Domain-based Message Authentication) to p=none for initial monitoring. Review authentication reports weekly. Move to stricter policies only when all authentication passes consistently.
- Add BIMI (Brand Indicators for Message Identification) and MTA-STS if inbox visibility and encryption are required by your organization.
Secure a dedicated IP address
- Assign a dedicated IP for email campaigns. Shared IPs link your sending to other users’ activity.
- Allocate separate IPs if you send over 100,000 emails per month or manage distinct business lines.
- Use different IPs for marketing, transactional, and support messages. Track each reputation separately.
- Dedicated IP fees range from $30 to $100 per month.
- Monitor all reputation and complaint rates by IP.
Verify domain and subdomain health
- Check the domain age before sending. Domains under 30 days face higher filtering.
- Run blacklist checks for all domains and subdomains before launch.
- Configure DNS with valid MX, A, and PTR records.
- Apply SSL certificates to every sending subdomain.
- Align domain and subdomain names with company branding and website.
- Use unique subdomains for marketing, transactional, and customer support streams.
Action item: Audit every technical detail using an independent deliverability tool. Send no emails until all checks pass. Any technical error at this step reduces inbox placement for months.
Phase 2: Crafting your warm-up strategy & schedule
Warming up the IP address is an ongoing process that should have a warmup strategy and a predetermined schedule – starting with a few emails sent per day and gradually increasing the amount over a period of 30 (or more) days.
Your warmup strategy must align with send volume, recipient quality, and ESP limits. Smart scheduling gives inbox providers a clear record of positive engagement from day one.
Segment your most engaged contacts first
Start every IP warmup by sending only to your highest-engagement audience. ISPs measure sender reputation based on positive user actions. Warming up with the wrong segment guarantees poor placement and wasted sends.
Consider these criteria to score and group your contacts before sending the first email from your new IP.
RFM analysis for email:
- Recency: Prioritize contacts who opened or clicked within the last 7 days.
- Frequency: Select users who consistently engage with most campaigns.
- Monetary: For e-commerce, focus on recent buyers or high-value spenders.
Engagement scoring model:
Assign point values to each user for objective segmentation.
- Open in the last 7 days: +10
- Click in the last 7 days: +15
- Reply in the last 30 days: +25
- Purchase from email: +30
- Social share: +5
Target only those with the highest composite scores in your first warmup batches. Do not include cold leads, lapsed accounts, or anyone flagged as low-engagement.
Lifecycle stage segmentation:
- New subscribers: 0–30 days since signup (use with caution, as new users may trigger unsubscribes)
- Active users: 30–180 days, regular opens/clicks
- VIP customers: Consistent engagement, high purchase or reply history
- At-risk users: Engagement declining in the last 30–90 days (hold back for later cycles)
- Win-back candidates: Inactive for 180+ days (never use for initial warmup)
Psychographic segmentation:
- Content preferences: Match segments to newsletter, promotion, or transactional focus.
- Purchase behavior: Separate impulse buyers from those who research heavily before purchase.
- Communication frequency: Group by users who prefer daily, weekly, or monthly emails.
- Device preferences: Prioritize mobile-first users if mobile engagement rates are highest.
Build your gradual sending schedule
A gradual sending schedule protects your new IP from suspicion, blocks, and spam placement. ISPs watch for sudden spikes, so steady, controlled increases are required for trust.
It’s best to start small and follow a documented ramp-up pattern.
For example, if you are planning to send 1,000,000 emails per month as a part of your email campaigns, you should start with only a few dozen warm up emails per day and gradually increase the number of emails sent until you reach your desired email volume.
Each provider has different thresholds, but this sample schedule covers typical SaaS, B2B, or e-commerce warmup flows:
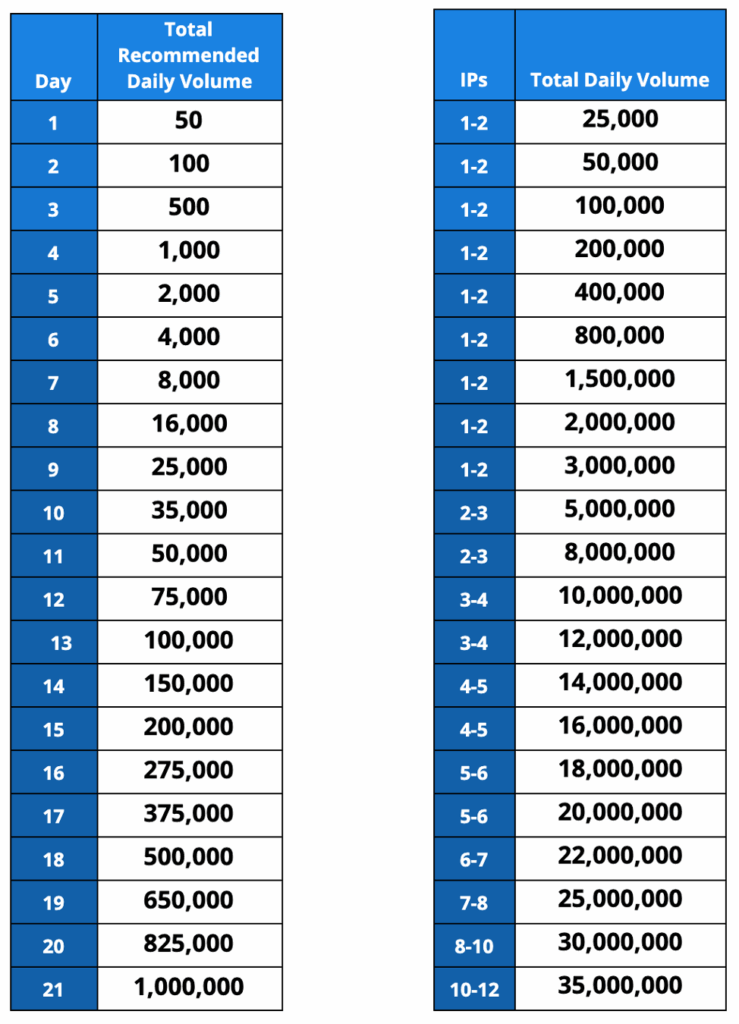
If you manage multiple dedicated IPs, distribute your total daily volume accordingly. Reference the right column to scale across 2, 3, or more IPs as you grow.
Example: For 2–3 IPs, you can ramp up to 8M–12M per day by day 11–12 if you’re sending at enterprise scale.
How to use this:
- Never jump ahead in volume, even if you see strong early engagement.
- Pause increases if bounce rates spike or open rates fall below 40%.
- Never automate your way out of a reputation crisis. If open rates tank or complaints spike, pull back and review content, authentication, and list quality immediately.
- Pause increases around holidays. Engagement patterns are less predictable; ISPs are more aggressive with new senders.
- Adjust for vertical. B2C lifestyle brands may find Sunday sends work, while B2B should stick to midweek.
- Warmup Inbox users: Warmup Inbox auto-pauses campaigns if health signals drop. Use inbox monitoring and blacklist alerts to avoid common mistakes that ruin months of IP warming.
Seasonality and day-of-week
- Holiday periods: Reduce scheduled increases by 50%.
- Summer/vacation: Lower engagement is normal. Don’t panic if open rates dip, but slow down if bounces rise.
- Best days for B2B: Tuesday through Thursday.
- Worst days: Mondays (mass inbox cleanup) and Fridays (distraction, lower open rates).
Understand your provider’s sending limits
Depending on the number of emails you want to send per day, you may want to look into upgrading your ESP.
We don’t recommend sending email blasts from a free Gmail or Outlook account because scammers tend to use these, and you’ll likely be flagged.
It’s also important to understand that many ESPs equate the “number of emails sent” with the “number of recipients.” In short, trying to circumvent the limits by BCC-ing all of your recipients on a single message won’t work.
Here’s a quick list of some of the most popular ESPs and their sending limits.
| Email Service Provider | Sending Limit (Per Day) |
| Gmail (Free) | 500 |
| Gmail (Google Workspace) | 2000 |
| Outlook (Free) | 300 |
| Microsoft 365/Office 365 | 10000 |
| Zoho (Free) | 50 |
| Zoho (Paid) | 300 |
| Zoho (Custom) | 2500 |
| GoDaddy | 250 |
| RackSpace | 10000 |
| Yahoo! | 500 |
| BlueHost | 150 (per hour) |
| DreamHost | 100 (per hour) |
| Yandex.mail | 500 |
| HostGator | 12000 |
| Amazon SES | 10000 |
| Proton Mail (Free) | 150 |
| Proton Mail (Plus) | 1000 |
| Proton Mail (Professional/Visionary) | unlimited |
| AOL | 500 |
| Mailgun | 300 |
| SendGrid (Free) | 100 |
| SendGrid (Essentials) | Up to 100,000 per month |
| SendGrid (Pro) | Up to 1.5 million per month |
| Sendpost (Starter) | 10,000 per month |
| Sendpost (Growth) | 600,000 per month |
| Sendpost (Scale) | 3 million per month |
New accounts, recent complaints, or list hygiene issues can cause your ESP to lower your limits without warning.
Clean and validate your email list
Healthy lists are non-negotiable in any warmup. Using old, bought, or scraped data will almost always trigger deliverability problems, even with a perfect IP ramp-up schedule.
To keep your email list clean:
- Remove invalid addresses before every warmup. Use a trusted verification service. Don’t trust manual checks or old export sheets.
- Delete hard bounces and obvious typos immediately. Repeatedly sending to dead inboxes signals spam behavior.
- Purge role accounts (info@, sales@, admin@) unless they’re proven to be responsive. ISPs routinely monitor these for abuse.
- Suppress unsubscribes, spam complainers, and non-responders. Never add them back in. Re-using suppressed addresses is a top reason for blacklisting.
- Watch for spam traps, which are addresses that never engage, have zero opens, or cause repeated bounces. ISPs use these to catch “list stuffers.”
- Segment new signups separately. Don’t mix fresh opt-ins with your oldest contacts during warmup. Ramp each segment with its own engagement baseline.
To get rid of invalid email addresses, spam traps, or soft bounces, you need to use tools like EmailListVerify that can automatically “catch” and delete these types of addresses for you.
Regular checking and cleaning of your email lists can help you to:
- Save money (and time) – with a “healthy” email list, you can be sure that your emails are delivered to real people and not wasted on error email addresses or bots.
- Protect your IP reputation – every email list can get some invalid email addresses, soft/hard bounces, or spambots from time to time. That’s why regular verification of emails in your list can protect your IP and domain reputation and keep them safe from unwanted email addresses.
Phase 3: Execution, content, and monitoring
Once your technical setup and warm-up schedule are live, your inbox reputation depends on disciplined execution. Every email, subject line, and user action during this period becomes a data point for ISPs.
Phase 3 of our playbook covers the real-world practices that move your IP from “unknown sender” to “trusted source”, or send it straight to spam.
Focus on high-quality, high-engagement content
Writing a good and relevant email copy does not probably need an explanation – if your email content is scammy or irrelevant, readers won’t click on any of your promotion links (and probably won’t open your emails in the future ever again).
At the end of the day, with scammy content, you will probably get a lot of spam reports, which will hurt your IP warmup process as well as your IP reputation overall.
Although creating a good email copy is a little bit of an art and requires some marketing skills, there are a few ways you can improve your content immediately:
- Keep the optimal length: Depending on the type of your email, you might consider creating a shorter (or longer) version of your content.
- In cases like sales emails or lead generation, nobody likes to read tons of text (especially if it is just a reminder of some product promotion or discount). On the other hand, newsletters or marketing emails tend to have slightly longer content.
- Personalize the message: Whether it is the name or the location of the recipient, writing a personalized email will keep the reader engaged and more willing to read your full message.
- Make it readable: Try to keep sentences short and concise, divided into small paragraphs, and with an easy-to-read font that users can quickly scan.
Only send content with a clear purpose and a direct value proposition for the recipient. Avoid generic greetings, recycled templates, or “spray and pray” blasts.
Tip: For those times where your email-writing inspiration is MIA, check out our free tools to help you get the job done: AI Email Writer & Email Subject Line Generator
Scrub your copy of spam trigger words
Spam filters are sensitive to the content that your emails contain, especially for risky words that just attract attention and mislead the readers.
Due to this fact, try to avoid words like “FREE”, 75% OFF, BUY RIGHT NOW, etc., since they will just increase the chance that your emails will end up in spam folders.
The same can be applied to clickbait titles or claims in your emails that are promising some prize, but in reality lead to something completely different.
Here is a list of spammy words that you should not include in your emails if you want to have a positive IP reputation (collected by Mailjet):
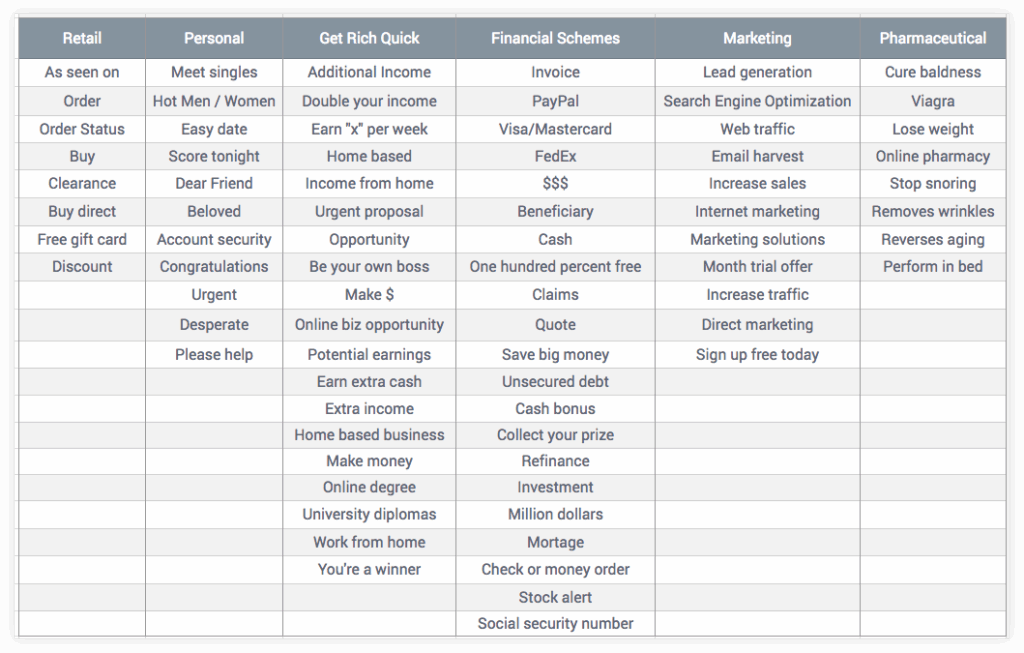
Tip: Warmup Inbox also has a free Spam Words Checker – use it to see how spammy your emails look to ISPs before you hit ‘send’ and find out the hard way.
Prioritize replies and maintain conversations
Building authentic engagement through two-way communication gives ISPs the strongest signal that your messages are wanted, and not spam.
Move beyond opens and clicks by designing emails that invite responses. Direct questions (“What’s your biggest challenge with [X]?”), feedback requests and simple one-question surveys always outperform passive messaging.
Reply management is a core part of sender reputation:
- Set internal response goals (4 hours during business hours) and use names, context, and personal references in every reply.
- Never send generic “Thanks for your message” responses.
Every reply is an opportunity to deepen the relationship: add a resource, suggest a tip, or ask a follow-up question to keep the thread active.
When volume increases, automated reply tools help maintain speed without losing the human touch. Use auto-responders to acknowledge receipt, track which topics generate the most engagement, and escalate complex replies to the right team member.
Monitor your reply rate as a KPI:
- 2–5% is a solid benchmark for B2B,
- 1–3% for media,
- and 0.5–1% for e-commerce.
If reply rates fall, rework your content or segmentation until you see real dialogue. This is the difference between trusted senders and mass mailers.
Monitor your metrics: open rates, bounce rates, and spam complaints
Continuous performance monitoring is non-negotiable during IP warmup. Use a real-time dashboard to check critical metrics every day:
- Delivery rate: Measures how many emails actually reach recipient servers
- Open rate: Tracks recipients who open your message
- Click-through rate: Captures engagement with links
- Complaint rate: Counts spam reports per 1,000 emails (keep this below 0.1%)
- Hard bounce rate: Identifies invalid or undeliverable addresses
- Unsubscribe rate: Flags list fatigue and opt-outs
Run a weekly analysis of advanced metrics to spot deeper trends:
- Inbox placement rate: Shows how many emails reach the inbox vs. the spam folder
- Read time: Measures attention span per message
- Forward/share rate: Tracks organic amplification
- Device split: Reveals mobile vs. desktop engagement
- Time to open: Indicates urgency or relevance
- Conversion rate: Connects email activity to business outcomes
Track performance by ISP using specialized tools like Google Postmaster Tools for Gmail, Microsoft SNDS for Outlook, and segment data for Yahoo and Apple Mail.
Common IP warming mistakes to avoid
Rushed schedules, dirty lists, and missed technical details are the biggest reasons new senders get blocked. Here’s what to watch for, and how to fix each issue before it harms your reputation.
Mistake 1: Rushing the process
Trying to ramp from 50 to 50,000 emails in days will trip every alarm with major ISPs. Sudden spikes signal spam tactics and often lead to immediate throttling or blacklisting.
How to avoid: Stick to your gradual ramp-up schedule, no matter how eager you are to scale. Only increase volume when you see healthy open rates and low complaint rates at the previous stage.
Mistake 2: Sending to an unclean or unengaged list
Blasting emails to stale, purchased, or disengaged contacts is the fastest route to high bounce rates and spam complaints. ISPs track these signals and will block your IP fast.
How to avoid: Validate and clean your list before every warmup cycle. Only send to recent, engaged contacts with a clear history of positive actions.
Mistake 3: Ignoring your technical setup
Skipping SPF, DKIM, or DMARC means your emails look suspicious to every spam filter. Even minor misconfigurations can tank your inbox placement overnight.
How to avoid: Complete a full technical audit before sending the first email. Use Warmup Inbox or a trusted deliverability tool to verify authentication, DNS, and domain health.
Mistake 4: Inconsistent sending volume
Pausing your sends for a week or more resets your reputation progress and signals unreliability to ISPs. “Stop-start” patterns make you look like a risky sender.
How to avoid: Maintain a steady, predictable sending schedule throughout the entire warmup period. If you must pause, ramp back up slowly instead of resuming full volume.
Mistake 5: Using poor-quality content
Placeholder emails, generic “test” content, or obviously automated messages drag down engagement and trigger spam complaints. Low-effort content gets low trust.
How to avoid: Write relevant, engaging copy for every touch, even during warmup. Personalize where possible, invite replies, and track which content earns real user action.
Solve your IP warmup issues with a warmup tool
Warming up a new IP is a pretty straightforward process, but also very time-consuming: you have to prepare engaging content, keep up with conversations, and continuously send more and more emails over a long period of time.
That is why it is always a good idea to use tools that are capable of warming up inboxes for you, such as Warmup Inbox.
Warmup Inbox automates the IP warmup process, manages engagement signals, and prevents deliverability failures.
You gain consistent inbox placement, instant feedback on technical setup, and control over every step, without the trial and error.
Take control of your sender reputation and try Warmup Inbox today to get out of the spam folder and into the inbox.


